Today we will be creating a beautiful painted background in your journal, using recycled materials. These are items you would normally throw away in the trash or recycling. We will discuss what supplies you will need, and how to use these random recycled materials. Then we’ll go step-by-step through the process of making a unique painted background for a 2-page journal spread.

Free and eco-friendly materials
One of the great things about art journaling with recycled materials is, the materials are free! When you’re first starting a new hobby, such as art journaling, you probably don’t have a huge stash of art supplies to dip into for your projects. Simply rummaging in your recycling bin or around your house can supply you with all you need to get started. And when these items wear out after a few uses, you can recycle them. Win-win!
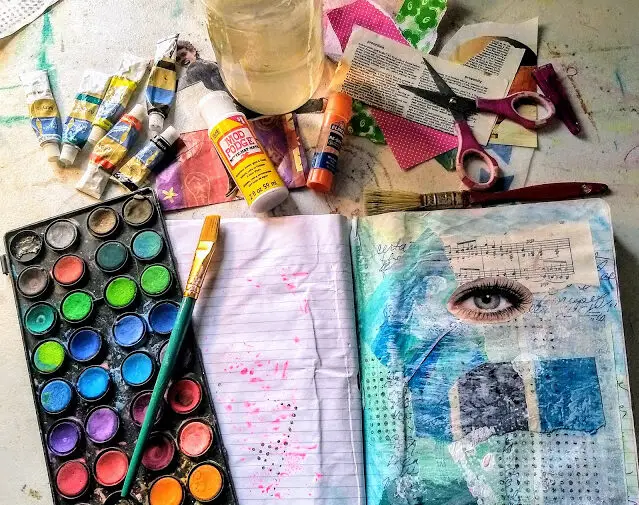
Of course, you will need a few store-bought items, as well. Let’s make a list of all the things you need, both the basics you’ll need to purchase, and the creative tools you can find around your house:

What You Need:
An art journal. This could be a blank sketchbook specially made for mixed media, as long as the pages are thick enough to hold up under wet paint. There are many different shapes and sizes of art journals, different types and weights of paper. For more about the basic supplies needed for art journaling, read the post What You Need to Start an Art Journal.
A bit of color theory…
Acrylic paints. I am using liquid acrylic craft paints. They’re inexpensive, easy to clean up, and they dry quickly between layers.
Cool colors: I am using cool colors of navy blue and lime green for the first layer, as they will easily recede into the background. (Also sneak in a bit of warm yellow for contrast and blending!)
Warm colors: I am using hot pink and orange for making wild marks on the top layers. These will make the foreground jump out and really POP! Of course, this is your project, and this is art journaling, where there are NO RULES! These are just the colors that I chose; you can choose whatever makes you happy!*

*Just One Color Rule: When using wet paint colors together in a layer where they could blend, it is best that you use colors that are close to each other on the color wheel, such as our blue and green. If you were to swirl some red and green together, colors that sit opposite each other on the color wheel, you’ll get brown mud! Never a great look, unless brown is what you’re going for. Once a green layer is dry, then you can easily paint red on top of it for an interesting complimentary look!

White Gesso: Gesso is a thick white acrylic paint, useful for completely covering up areas of paint that need to be hidden. Gesso is also useful for preparing all kinds of surfaces for painting, as it firms up and smooths out surfaces that may be weak or bumpy.

Recycled Materials:
Plastic food tray (aka Paint Palette!): Simply an old throw-away plastic dish from the grocery store will work for applying and mixing your paints. (Just remember to wash it first, and after a few uses, recycle it!)
Old plastic credit card or gift card. These are used for spreading the paint in large smooshes, smears and swaths. (They are also useful for smoothing out the bubbles when creating a paper collage, but that’s for another day!)
Sponges. I am using a sea sponge and a round sponge, (and yes, I’m sort of cheating, mine are actual art sponges, sorry!) but you can use any kind of sponge. Even kids’ sponge stamps. We will use them for dabbing on paint, smearing and smooshing!
Bubble wrap. Bubble wrap makes great looking textures. Try finding a couple different sizes of the bubbles, for variety.
Cupboard liner. This is that rubbery material you can use to line your kitchen cupboards. It’s got a wonderful bumpy texture that looks great when dipped in paint and pressed onto paper. (In the photo below, the cupboard liner is that rectangle of green material in the middle, to the right of the bubble wrap.)

**Tip: If you cannot find some of these random scrap items around your house, don’t sweat it! Just use whatever objects you think would make interesting marks and textures!
Scrap of corrugated cardboard: The thicker the lines, the better!
Beauty tools and toys from the pool!
An old comb: Dip this in paint and look at the cool lines you can make!

An old toothbrush: Smothered in paint and flicked with your thumb, this tool adds a great spattering of speckles across your art.

Slice of a foam pool noodle: Totally optional, of course, but if you have an old worn-out pool noodle that you don’t mind cutting up, a slice of this foam thing makes a great impression!

Recycled materials from the kitchen:
Plastic straws: (Ahh, one day we will live in a world with only biodegradable straws and things, but until then, let’s recycle our straws through art!) These straws are fun to dip in the paint, either singly or as a bunch, and make fun tiny circles!

Cardboard roll from paper towels or food wrap: Turned on their end and dipped in white gesso, these circles of thick white paint are the icing on the cake of your finished journal page!

Step-by-Step, Video Instructions:
While the photos above give you a pretty good idea of what this process will look like, I have also made a couple videos and a slide show to further help you along.
This first video (above) shows the first step, preparing the background color. You will want to wait for those paints to dry before starting the second step, (seen in video below), but it shouldn’t take more than a few minutes.
This second step, adding bubble wrap texture with white gesso, gives a little breathing room for all the crazy marks coming up!
Steps in Review:
- Prepare palette with 2 cool colors (blue, light green) and a warm color that blends well, such as yellow.
- Paint your page in large, loose swaths of blue, using the plastic gift card.
- Sponge on some green and yellow. Smear it in places, lightly dab it in others. Cover most of the edges, but leave a few white spots here and there.
- Let dry.
- Apply white gesso to bubble wrap. Lightly tap it onto your painted background. Press down firmly in places for a clearer image.
- Apply gesso to other texture objects you may have, such as drawer liner, corrugated cardboard, drywall tape, or similar objects.
- Let dry.
- Prepare palette with 2 warm colors, such as bright pink and orange.
- Add a little water to one color, (pink) and blend so it becomes thin and inky.
- Lay a comb into the watery paint so that its “teeth” are covered. Stroke the comb across the page, leaving pink lines, as desired.
- Load up the bristles of the toothbrush with orange paint. Hold it close to your page. Slowly run your thumb across the bristles to create orange speckles onto your paper. Repeat as desired around your page.
- Dip your pool noodle piece into paint. Dab it in a few places on your page.
- “Paint” small circles using a single straw dipped in paint. Then bunch several straws together and create bunches of small circles, having dipped the whole bunch in paint.
- Dip the end of a cardboard roll into the white gesso. Stamp white circles across your page. Occasionally dip it into one of the warm colors, for variety. Try layering circles of different colors, creating half circles on the edges and middle of your layout. Have fun!
Art Journal Background and Beyond
And there we have our finished painted background. No paint brushes were harmed or even used in this project!
Once you have completed your project, art journaling with recycled materials, sit back and admire your work.
Examine all those little details you added, using just recycled materials, such as straws, cardboard rolls and bubble wrap!
What you do with your finished piece is up to you:
You could add a visual focal point by gluing down a large image or quote.
Maybe add your own handwriting or paint a large image on top.
Or how about try this same technique on a large framed canvas, using this page as your inspiration.

You could rip out the page and make it into a greeting card. Just glue it onto a blank piece of folded cardstock, add a stamped sentiment, decorate and voila!

Or just leave this page as it is, and enjoy looking at it for years to come.
I hope that you have enjoyed learning to art journal using recycled materials. Perhaps you have learned some skills to use in future projects. I hope your own ingenuity has been triggered, to find new creative uses for throwaway items. But most of all, I hope you had fun and enjoyed some personal time of mindfulness and creativity.
Thanks for reading!
Jennifer